Tuesday, 16 October 2012

First batch of maquettes- glazed

You have not known panic until 5 minutes before a tutorial you've stuck your hand in a still hot kiln, dragged maquettes out, hastily arranged them on a wooden board, and carried them 300m down a corridor obstacle course inhabited by 100 people who are completely pre-occupied and have no idea of personal space or the delicateness of ceramics.

And that's what I had to do today, lest I turn up to a tutorial with nothing but a sketchbook with a quick scribble of a zombie shopper in it, and a slightly larger sketchbook with a handful of newspaper clippings and photos from the Ikea catalogue slapped in.

So here we go, 3 weeks into the year and I have glazed maquettes. As usual, apologies for poor photography quality.


"Día de los mermaid" just got a coat of good gloss, but I think I have the consistency a bit off, which is what happens if you're rushed and lazy and mix powdered glaze by eye with a whisk.


"Pig Headed" is painted with underglaze. I am having a hard time getting that stuff right- it streaks, it clumps, it smudges as soon as it dries, the colours you mix in the print room can turn out completely different- but I feel that Pig Headed came out truest to what I was trying to achieve.


Unfortunately some of the colours on other pieces did not come out as well.

"Red Headed Hussy" ended up with a skin-tone reminiscent of an old over mud mask...
...but I am totally in love with the fiery colour of her hair! 


The seal kept all of its detailing through painting and glazing, but I feel something about the expression just got lost.


I'm really happy with the background detail though. Just need to find a good black lustre that I can oil slick the water with!


"Sunday Morning" is probably the maquette I'm most happy with- I love how the bedspread came out and it seems to have got the best application of glaze. Not too big on Jacques' skin tone though, I feel he ended up way too dark. Obviously the black underglaze is way more potent than I thought.


Again, I think some of the expression got lost in the firings, but Percy and Jacques still have plenty of character so they're a good jumping off point for future pieces.

Lastly, "Mindless Consumer #1", a.k.a zombie on a sofa. He's in bisque and is only here because I was naughty and snuck him into a glaze firing at the bottom.


Detail:

Yes, that's a little remote control next to him. It's hard to tell from the photo, but it even has little buttons.
And here's how he's supposed to be set up- opposite his zombie box!

The opiate of the masses, of course.

So where do I go from here? I think the plan, for now, is to make some moulds- not of the people, but of the backgrounds. I'm going to start with a bed and a sofa, and go from there, using them as bases to stage scenes on.

Second priority, sorting out those damn colours.

Thursday, 11 October 2012

First batch of maquettes of the new year

I have been back at school for nearly 2 weeks now and already managed to produce a handful of maquettes, which is very good for lazy old me. Don't start thinking I actually care about my education though, I'm already behind on dissertation research. I think the problem there is that I don't like writing essays, all they do is stress me out and mess up my wrists. The maquettes are procrastination from the academic drag.

Anyway, here they are, I will explain more about them when I get them out of their glaze firing on Wednesday (if they survive, fingers crossed!). All of these survived the biscuit firing in some shape or form. The pics aren't great, it's hard to capture the emotion of the pieces with poor photography.


Poor pig girl here lost an ear after biscuit firing when I was carrying her to the glaze room. She wobbled and hit the headboard of the piece with two guys in bed. The ear then got blasted away by the spray gun in the glaze booth, so when she's fired I'm going to try and sculpt her a new one out of a restoration putty.


Eventually this will be glazed with black lustre so it looks like the seal has been the victim of an oil spill.


 This maquette did not survive the kiln well at all, due to the use of wire inside. The tree was just too delicate. As you can see in the photos, the branches dried out too quickly and just ended up cracking. But it's okay, it's a maquette! I may also take this as a sign that God is smoting my religious work. Poor Adam and Steve.


So what is my project about? Well, as you can see, I'm making figurines. The idea is to make alternative figurines, the sort that just don't exist at the moment. This includes showcasing people who aren't white and skinny or straight! You very rarely see people who aren't Caucasian in the figurine world, unless they are in some kind of ethnic dress- Inuit furs, Native American headdresses, naked African girls with pots on their heads. I want to change this and make a more exclusive world of figurines.

Oh and also there may be zombies.

Saturday, 29 September 2012

How I tricked myself into eating a half a head of cauliflower

Cauliflower and I do not have the closest relationship. In fact, in all honesty, it's probably my least favourite vegetable (unlike the popular sister, broccoli). I have horrible flashbacks of school cauliflower cheese, forming this homogeneous cream slop dished out by dinner ladies. I have visions of these rank microwave steam bags of vegetables full of cauliflower and green beans, my two vegetable enemies. Gross.

But, as with many things in life, it turns out I was wrong.


While looking for something or other, I can't remember what, I stumbled across a site called Nom Nom Paleo, and more specifically, a recipe for Cauliflower Rice. Now I don't really agree with the whole paleo thing, I am definitely not ready for that diet, but if there's a way I can make a vegetable tasty without adding sugar or deep frying it in batter, I am so there. So here's my version of cauliflower rice:


With no food processor, I grated the cauliflower instead, which turns out to be a fantastically efficient way to a) make your kitchen look like a dandruff shampoo advert and b) lose chunks of your fingertips. But it was a surprisingly good arm workout. Maybe this is actually how hippies stay so thin, they just expend a lot of energy prepping their food.

I used spring onions instead of white onion, added in some lil strips of bacon, then added some turmeric, chili flakes and ground cumin, so the end result was vaguely Indian tasting. It was really rather good, to the point where I ate the whole pan-full, which is totally okay because cauliflower only has 31 calories per 100g, compared to white basmatic rice at 349 calories!


Afterwards I was all "oh that was filling" and then realised I'd eaten half a head of cauliflower. So yes, that would be filling.

I also made kale chips. If you want to know what the experience of eating a kale chip is like, go outside and stick your mouth in some dry leaves. They tasted okay, but it was uncomfortably close to eating autumn foliage. Maybe worth a try if you really really like crisps, but are going low carb.


They're very lightweight and have a habit of blowing all over the kitchen.


But that's okay because it's Saturday! And on Saturday my flatmate goes to work in his home town suburb of London, so I can make as much mess and as much noise as I want! Yaaaay!

Out of courtesy I should probably go missing midweek so he gets the same privilege.

...nah.

Friday, 28 September 2012

Sprouting update

Here is the flax I'm growing as a micro-green crop on kitchen towel:

Some of the seeds have barely sprouted, while a couple are well on their way to being little plants. That gross glisten across the seeds is the mucus that they produce. Apparently some people use it as hair-gel!


And here's the hemp I was sprouting in a jar:

Again, very inconsistent levels of sprout- some of them didn't seem to have sprouted at all, while a couple had very long tails.


They also smelt a bit strange, almost like stagnant water? Similar to the smell you get when you leave a water bottle out for too long. I rinsed them at least 3 times a day, so I don't know why this happened- maybe because I was standing the jar up straight instead of upside down not enough water was draining off? I tried shaking the jar dry once and the elastic band fell off, leaving me with a sink full of hemp.


They tasted okay. I think I need to do some more experimenting.

Saturday, 22 September 2012

Sprouting!

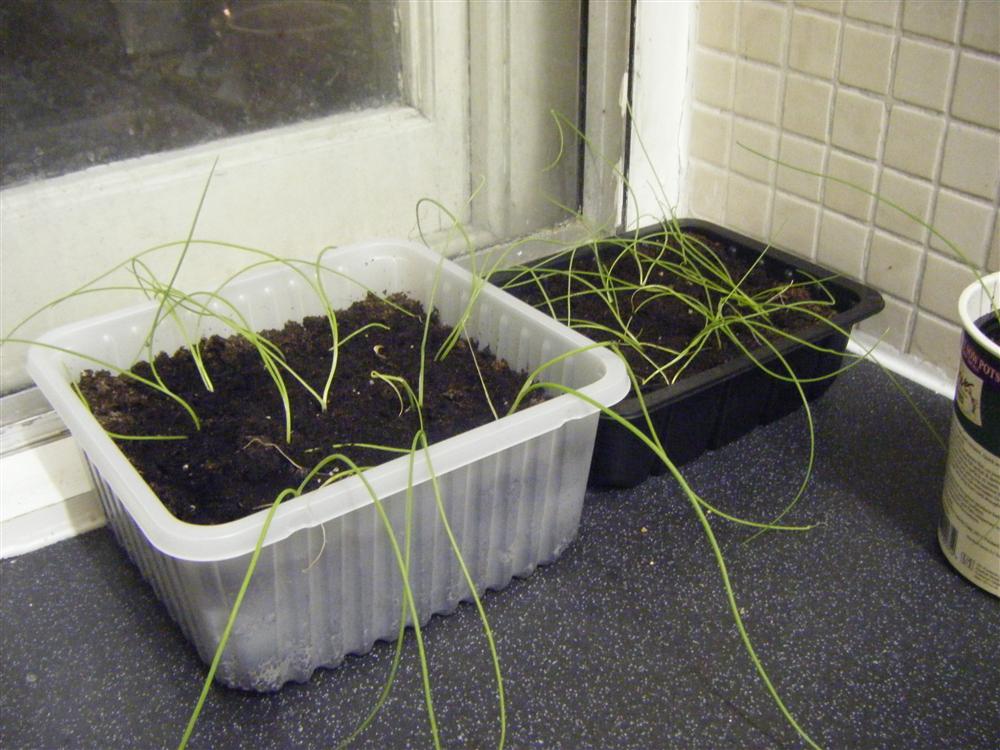
Growing things is awesome (and an excellent lesson in patience for twitchy people like me). Growing things you can eat? Even better. Right now on my kitchen counter I've got some seriously leggy spring onions:

I have no idea if these will actually mature or not, especially as we head into winter and lose more and more light. So I wanted to grow some other things. Enter: sprouting. I did some sprouting in my first year of uni in halls with some GMO soy beans, just to see if they would grow (they did, but they didn't taste that good). This year, with Whole Earth hippy supermarket just down the road, I have access to all kinds of grains that are for sale by weight. Today I bought some linseed and hemp-seed.

This is what you will need to get started sprouting:

  • Jam jars or mason jars. Guess you could also use large yoghurt pots, but you wouldn't be able to see the sprouting process.
  • Mesh fabric. Mine came from the remnants bin of Cloth House Soho. You could recycle some net-curtains or use fly screen too.
  • Scissors.
  • (not pictured) Elastic bands.
  • Seeds that have not been heat treated.

Linseed is on the left. It's also know as "golden flax". It's packed full of all sorts of health benefits and hoodoo magic like Omega 3, and it's surprisingly tasty. But don't eat too much, as it's supposedly pretty good at clearing out your pipes.
DON'T TRY TO SPROUT IT- see the update at the end of this section.


On the right is hemp-seed. In some countries you will not be able to get raw hemp-seed for sprouting because of drug restrictions, despite the fact that it's a separate species from marijuana. In fact, I'm not even sure this will sprout, I forgot to ask a member of staff at Whole Earth. Hemp-seed is high in protein and lots of goodies including antioxidants.

-Cut out a piece of mesh that will cover the top of your jar with room to spare:

-Chuck some seeds in the bottom of your jar. I used 3 teaspoons. I'm not sure how big these will expand and internet sources have told me so many different ratios of seed to space that I decided to go on the cautious side.

-Put the mesh on top and hold in place with an elastic band:

-Check that the mesh doesn't have holes that are big enough for your seeds to escape through:
Hooray! If your seeds fell out everywhere, you'll have to procure another piece of mesh with finer holes.

-Cover the seeds with water and soak for 4-8 hours. Some people soak overnight.

-Tip away the water, and rinse your seeds through the mesh.
You need to repeat this process about 3 times a day. So before you leave the house in the morning, when you get home from work/school, and before bed. If you know you wouldn't be able to rinse them for a sustained period of time (say, 10 hours or more), popping the jar in the fridge will supposedly stop anything going bad.

That's it really, keep rinsing, wait a couple of days and eventually you'll have a tasty crop of sprouts. I'll update when these babies are at munching point!

UPDATE!-
Turns out you can't sprout linseed like this, you just end up with a gross jar of snot, which I would have known if I'd done my damn research. Turns out that linseed is the hagfish of the seed world. You have to sprout them on a tray instead. 

On a related note, did you know you can grind linseed with a hand blender?
This is good to know because without grinding or thorough chewing, your body won't be able to extract the goodies from within. Tonight I tried some of this with honey and it was delicious! Next stop, adding it to proper recipes... I'm thinking my chickpea burgers could do with a boost.

Sunday, 16 September 2012

An Alara Adventure

Last week, I finally got round to checking out Camden Garden Centre, tucked in a little side street less than 1km from my house. It's a cool little place, with a fantastic selection of cacti and succulents, but I was broke so I didn't pick any up. I did, however, pick up this leaflet:


Captivated by the thought of meeting (possibly single) dirty hippies and entranced by the word "smallholding", I decided to head down there and see what was what and check out their garden. Hidden on an industrial estate, it wasn't the easiest place to find, but what a cool little find it was! A long thin vegetable garden with many established plants, including some I'd never seen before, like the Japanese wine-berry, and even a couple of beehives.

It turns out Alara is a cereal company, not just the name of a garden. Their factory/warehouse is based on Camley St, pretty much equal distance from home and school. Alara was founded in 1975 by a squatter who found £2 in the gutter. I met him; his name is Alex and he runs the garden. Alex was very nice.

As promised on the back of the flyer, there was a compost area that needed clearing. It consisted of a sizeable mound of earth and rubble, and a skip to dump the lot in. I got stuck in with a pickaxe and managed an extremely rewarding sweaty 2 hours in the afternoon sun, clearing roughly 1/3rd of the pile. For my excellent slave labour efforts, I was paid in cereals:


Afterwards, Alex and I had a rewarding talk about how people are made of dirt, which I guess means we're all really dirtbags.

I doubt this is the last I've seen of Alara's garden. 1- because I've missed being outdoors with sweat-marks the size of Texas and a daunting physical task in front of me, and 2- because I'm sure I heard the phrase "free lunch" some time during the day. FREE LUNCH.

In other news, here's a collaborative painting Sajan and I threw together after a massive chicken dinner and probably too much wine. The colours are more vibrant in the flesh.

I need to get into the habit of speed painting so I actually have stuff to sell in my stupid art gallery. Pfffffffft, business.

Monday, 3 September 2012

Add a shelf to a wine crate and make a bookshelf.

A few months back, I saw this post on Offbeat home about using wine crates as shelving. I loved how they looked, but a) didn't have access to wine crates and b) live in a rented flat where I'm not allowed to bash holes in the wall. Then I started working for a restaurant & bar guide, who share their offices with a drinks magazine. The corner by the door was stacked to overflowing with wine crates, and after some carefully directed begging, I walked into work to find one by my desk. Result! But I still couldn't hang it up on the wall, and on it's own it was just an awkward box. Having been painted white for a winter magazine feature, it didn't even look that nice.


Meanwhile, since moving into this flat, I'd started to accumulate books at a slightly alarming rate from friends and colleagues (sometimes playing up the "I'm poor" angle can be very beneficial), and was fast running out out shelf space. So I put two and two together, went down to Kentish Town's terrifying Aladdin's cave hardware store (it's amazing) to buy some tools, and got to work shoving a shelf into my crate.

Here's the tools you will need to bodge this job as well as I did:


Pictured: wood glue, sandpaper, saw, clamp (it's best to have 2 of these but I'm an idiot), panel pins, piece of MDF I found in the cupboard
Not pictured: hammer, piece of wood measuring 19mm x 32mm x 1.8m, ruler, damp cloth for wiping up wood glue

First things first you need to measure the depth of your wine crate. Then mark the length twice on your 19x32 wood and saw off 2 pieces. 


Oh what a miracle, it fits. You then want to sand your pieces of wood so they're not all horrible and splintery.
Now take whatever you want to store on the lower part of the box, put it in and mark it's height on one side of the box.


Stack 1 piece of wood on top of that mark, and draw a line straight across. Measure the height and mark a line at the same height on the other side of the box.
Now get 1 piece of wood, liberally apply wood glue, line the top edge of the wood up with the pencil line, and clamp in place.


PLEASE NOTE- you want to use your clamp the opposite way from my photo, this way damaged the outside of my crate. It left a weird circle mark. You have to remember, I'm an idiot.
After a few minutes, hammer in your panel pins. Because I am an idiot (remember?) the panel pins were too long, so that's why the heads are sticking out.


Repeat on the other side, and you'll end up with something like this:


Now take the piece of MDF you found in the cupboard (that was suspiciously very close to the depth of your box) and cut it to fit the width of your box. Cut it accurately or you will have to slice down the edges with a craft knife like this numpty. Sand the edges to get rid of any rough spots.
Squirt some wood glue on the top of your wood lumps and shove the shelf down on top. Add extra wood glue along the join between the shelf and the box and swipe it with your finger to fill in any cracks and make it look slightly nicer.


If your shelf is a bit loose, you can clamp it and add panel pins.


And there you go. One shoddy bedside table/bookshelf. Just add crap!


Shh! You hear that scraping, whizzing noise coming from St Martins-in-the-Fields? Chippendale's spinning is his grave.