Wednesday 28 December 2011

Sock Scarf

I made this ages ago, way back during the summer. I was sick of knitting and needed a project to take places because I get bored really easily and don't want to offend people I'm talking to by not paying attention. The only way I can listen well is with something in my hands to divert a part of my brain, otherwise I just end up interrupting people (an incredibly bad habit I am trying to curb).


Anyway, I figured I'd talk about it because you may have, like me, got a lot of new socks from Christmas (yay!) and can finally clear out the old ones.


So for this project you will need a bunch of old, clean ankle socks. I used ones that had been separated from their partners or had worn through at the heel or toe. With all the walking I do, my socks get shredded, and I swear shops are selling thinner and thinner socks in an effort to keep prices low.


To prep your sock, you need to cut off the band at the top, the toe, and the heel. This will leave you with 2 cylinders of sock. Cut down both sides of these and you should end up with 4 rectangles. If your sock is particularly old, the bottom section might be worn and discoloured. If so, discard those 2 rectangles and use only the 2 from the ankle portion.


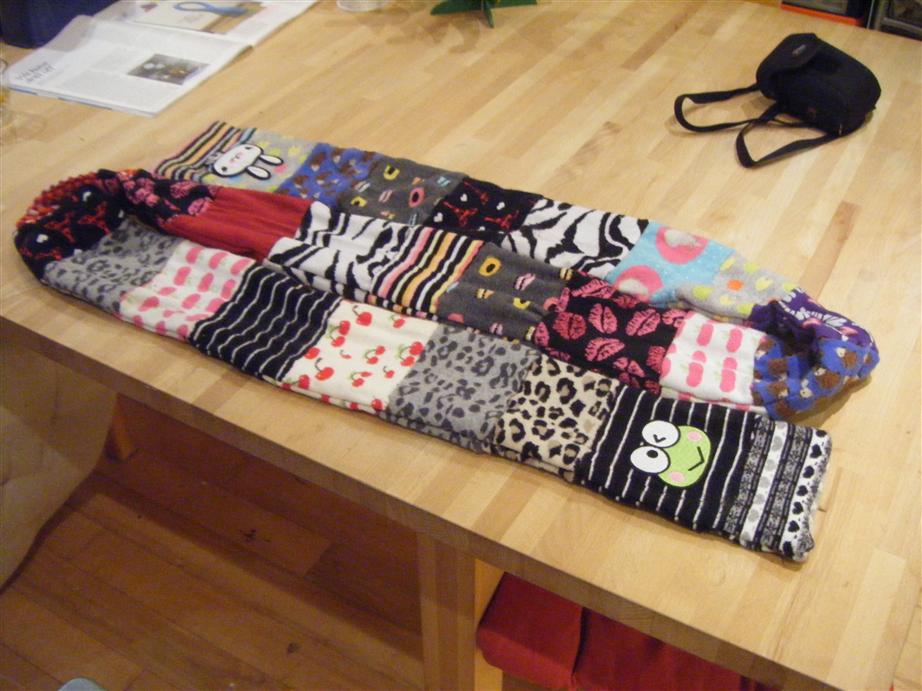
You're going to need a big pile of rectangles for this scarf. Mine used 54.


Now you need to sort out the order your scarf is going to follow keeping sock rectangles in their pairs. Essentially, the scarf is made from a giant long strip of socks, folded in half and sewed down the sides. Each side needs to match up, so first work out which socks you want placed where, then carefully separate the socks into 2 identical piles following this order. Flip one pile over and stack them together, so that the pile mirrors in the middle (this sounds a little confusing but really isn't, I may make a diagram when I find my tablet). This is your sewing order.


Get sewing! I sewed my scarf by hand as a portable project, but machine sewing will be stronger and quicker- I recommend a stitch designed for jersey if your machine has one. Sew the rectangles together with right sides together so the seam forms on the wrong side. When you're done, you'll have a strip double the length of your final scarf. Fold it in half with wrong sides together and machine stitch down the sides, leaving the bottom of the scarf open. Turn the scarf right side out, give it a press with a hot iron, and stitch the bottom edge closed.


Now it's time to decorate! I weighed down my ends with patches, but you could add beads or buttons, or sew on a fringe made from left over bits of sock.


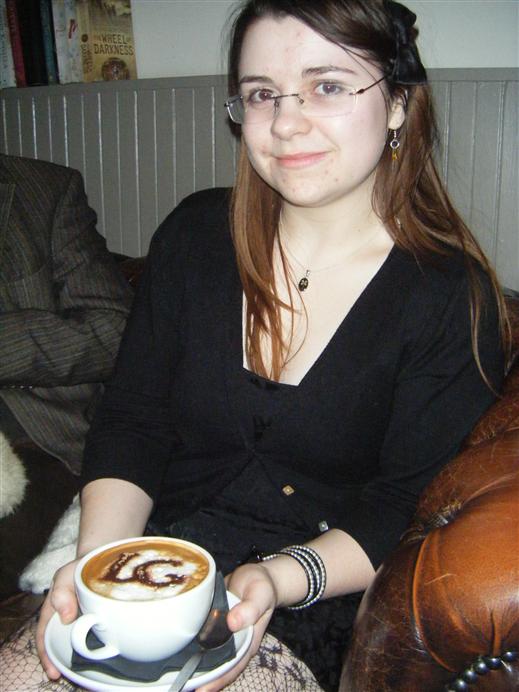
And that's it really. The scarf is snuggly, soft and fairly lightweight because it's made of cotton instead of something heavy and potentially itchy like wool. Here's me wearing mine, to give you an idea of length. I'm 158cm tall.


I have had some weird reactions to sock scarf. People generally think it's very cute, then get weirded out by the fact it's made of socks. One person even told me it was "gross" because "eww, they've been on your feet, and now they're round your neck". I think this reaction sums up how I feel about it best:
I wear socks made of cotton, and cotton is not only harvested by people who are only slightly better off than slaves, it also uses up vast amounts of water (and is grown in water sensitive areas of the world). In addition, according to the Environmental Justice Foundation:

"Cotton grows on 2.4% of the world’s arable land, yet it is responsible for the release of over US$2 billion of chemical pesticides each year.


When people are being treated as disposable and poisoned so that the first world can enjoy affordable things that we see as essential, don't you think we should respect the end product and get the most out of it, instead of creating another environmental problem by dumping it in landfill?

Although I may draw the line at a pants quilt. Maybe.

Monday 26 December 2011

Cheesy biscuits

I hope you all had a lovely and stress free Christmas day! I'm not going to post photos of my loot, that's vulgar (I'm too lazy to take photos). Instead, I'm going to show you how to make a cholesterol filled snack to poison house guests with. They are extremely moreish and can be tweaked in so many ways, plus they are an excellent way to use up cheese that needs eating. Serve them alone, with spreads and dips, or as croutons in a salad. 


Here's the base recipe:

  • 200g self raising flour
  • 100g butter
  • 100g cheese 
  • flavourings/seasoning 
  • 1 egg
-Preheat your oven to 180°c
-Put your flour in a large bowl, and add the butter. If the butter is very hard, it's best to melt it in the microwave (20 secs should do it). Rub the flour and butter together with your hands until it reaches a consistent crumb texture.
-Grate your cheese and mix it in. Add your flavourings. I chose a teaspoon of oregano and a teaspoon of mustard powder.


-Crack your egg into the bowl and beat it with your hands to break up the yolk. Begin to drag in the flour mixture and work until it forms a dough.

-Roll out your dough onto a floured work-surface or piece of baking parchment using a floured rolling pin. You're aiming for a thickness of about 4mm. Cut out your shapes...

-... place them on a baking tray and bake them for 15 minutes.


-When they're done, put them on a baking rack to cool (mind your fingers!).

Variations:
  • The easier change you can make is swapping out the cutter or discarding it entirely. Choose a cutter to match the theme of your party- bats for Halloween, palm trees for a luau etc. If you want to make small bite sized pieces, cut diamonds but cutting the dough into strips and slashing it into diamonds. You can also take strips and twist them to make baked cheese twists.
  • Flavours! There are so many options here. Add your favourite herb, fresh or dried. Add tomato or garlic purée for a richer flavour. Change the cheese- I used cheddar and some parmesan (the powdered stuff is awful, but good in this recipe!), but try any cheese you've got.
  • Change the self raising flour for plain and you'll make a denser biscuit.
  • Make a healthier biscuit by leaving out any salt, swapping for a low fat cheese and using wholemeal flour and a teaspoon of baking powder instead of refined flour. In theory you could substitute the butter for something healthier, but you'd be an utter killjoy.
And lastly, if you have a lot of spare time or some brain problems, I guess you can decorate them.


Monday 19 December 2011

Dried orange slices

I had loads of oranges left over from making marmalade and neither the inclination to make up more or the jars necessary to do so. So I decided to put them to use as Christmas decorations! They are incredibly easy to do and biodegradable, unlike regular plastic ornaments.


The craft works best with older oranges, ones that have started to petrify. Slice them up as thinly as you can (3mm slices are ideal) and place the slices on a tea towel. You want to make sure your slices are as even as possible or they'll all dry at different speeds and you'll end up with some ugly burnt slices!


Place another towel over the top and pat the slices down to blot off as much excess juice off as you can...


...then place the orange slices on cooling racks and put them in the oven at a low temperature. Putting them on cooling racks instead of baking sheets allows the warm air of the oven to attack the orange from all angles.


They take a few hours to dry out and you need to remember to leave the door ajar so that water vapour can escape, otherwise the orange slices will just cook in their juices. Have a good look and a poke every so often to see how they're coming along. When they're done, they'll feel dry, although they may feel a little tacky.


Here's some of my finished ones. If you're worried about burning them, take them out of the oven, leaving them on a cooling rack and just keep them somewhere dry inside for a day or two. The atmosphere should dehydrate them further.


They look really beautiful with light shining through them:


So perhaps arrange them so they mask the bright glare of LED fairy lights?


I have also heard you can sprinkle them with cinnamon or glitter before drying, to create a scented slice or a sparkly one!


~LATER~


hee hee


....


teee hee heeee

Sunday 18 December 2011

A dress is made, and Ru turns 22

Happy birthday to me!


The hedonistic pose is rarely flattering.


Yesterday, I turned 22 and celebrated with excellent friends and an excellent pub- The Laughing Gravy on Blackfriars Road in Southwark. The staff were friendly and wonderful and make all their drinks with care. Just look at this customised cappuccino!


So that was my birthday, and now I am officially in my early 20s. Oh dear.


In other news- I made a dress! I am actually pretty proud of myself, after years of making ugly and nigh unwearable clothes, I put together a lovely dress that looks good on, suits me, has a high level of finish and will hopefully last me a while. My current favourite dress, an excellent buy from Oxfam Reworked in Reading, is starting to look a little tatty, so I'm hoping my homemade one can take it's place.


Not the best picture, but it gives you a rough idea of how it looks on (I took this before I hemmed it, so the finished length is a little shorter). The cotton is comfortable and hangs well, and the dress looks great over a petticoat, although I do wish it was a little more flared.


The bodice is completely lined, and I made the built in sash/belt from the same material. The base material is a cotton printed with Ukiyo-e style portraits of Japanese ladies, with kanji in the background. Not being able to read kanji, I have no idea what it says (probably something like "this person has terrible taste".


The pattern I used was New Look 6910, view A with the plain sash (there's an option to add a bow or rose).


If you do a quick search for that pattern you can see the hundreds of other women who've chosen to make it too! It's pretty popular, although a few other ladies on pattern review sites noticed the problem that I had- there's too much space in the shoulders. If I hadn't been alone in the house when I was sewing (or if I had an accurate dressmaker's dummy) then I would have altered the bodice to fit better. As it stands, around the shoulders and back is a little loose on me, but I may get round to changing that in the future.


Costs:
-Main fabric was £14 a metre (a big expense when I bought it 4 years ago!) and I used 1.6m of it so that's £22.40
-Lining was £2.50 a metre and I used 1 metre of it
-55 cm zip from John Lewis was £5.50! I am going to start buying my zips online instead, because that's ridiculous.
-Thread was £1.50 for 100m I think.
-Pattern was £5.89 from Jaycotts, but they were doing a 10% off offer so it was actually £5.30. Shipping was £2 I think.
Total: £39.20
Time spent- I think it took about 5 hours (including cutting out the pattern), and I work at a fairly relaxed pace.


I think that's pretty reasonable, as similar dresses sell for anything from £25 to £50 in high street shops like Next or New Look. And of course, the thread and the pattern will carry on over to other projects, and when I am done with the dress I will recycle it into something else.


My favourite thing about this project was that I have finally started to harness the real power of my sewing machine. I've been straight stitching and sewing button-holes for a while, but until I made this dress I had no idea it could overlock or sew a blind hem. The overlocking looks professional and will come in handy if I start working with jersey or making t-shirts. Blind hemming means I don't have to faff around sewing hems by hand- the machine does it very well with a neat and professional finish.


I can finally make pretty things :)

Tuesday 13 December 2011

Hooray for charity shops!

One thing my crappy home town of Slough has going for it is the charity shops, filled with bizarrely good stuff. I have no idea if this is because old people moved to Slough when it was filled with promise and have now died and passed on their possessions, or if it's because people from Windsor drive all the way to Slough to drop off their second hand stuff, lest they risk being seen by neighbours at their local Oxfam.


Yesterday I went to British Heart Foundation and Oxfam. I would have had a nosy around Scope too, but it wasn't in the direction I was headed, and my arms hurt. BHF usually has a good range of quality clothing, but it tends to be a little bit more expensive than other shops. They have an excellent DVD selection- I got a 2 disk edition of Grave of the Fireflies there for £2- and the books aren't bad. Oxfam has an amazing selection of vinyl and a good assortment of books and brick-a-brac.


Here's what I picked up:


From BHS:
-The Beatrix Potter Knitting Book (£2). It has some absolutely horrendous faux Victorian knits in there, but there's a nice range of picture knits of woodland creatures.
Some, like Tom Kitten, look a little off.


But most of the bunnies are adorable. And that's what I like. Adorable bunnies (when did I become such a softie?)
If you added up all the good picture knits and knitted them in blocks, you could make a really lovely blanket for someone who likes woodland critters.


-The Encyclopedia of Advanced Dressmaking (£2). Dated 1978, this thing is another gem in my growing vintage sewing book collection. It's got information on working with lots of difficult fabrics; not just velvet and sequins, but even leather and suede, and there are patterns included. You just have to photocopy them to a million times their size. The highlight has to be this wedding dress:
LACE MONSTER


Anyway, an excellent resource for hacking out authentic late 70s wear.


From Oxfam, I got:


-hand painted carp design tea cup and plate set (£3.50). There are 5 tea cups but only 2 plates. On the back "Made in China" is stamped. These are fairly low quality, so I think they might be a souvenir set brought back from holiday or from Chinatown. I like them though! The hand painted fish all look different and have their own personalities.
Now I can think of everyone's favourite pokémon- MAGICARP- while I drink tea.


-Bizarre possibly Russian fabric/tablecloth (£2.99). I have no idea where this came from. It's quite offensive to the eyes, and what worries me most is that as this is a commercial fabric print, it's possible some other sap has matching homewares D:


The background is a khaki green, with panels of royal blue covered in tiny flowers which surround larger panels that portray scenes of somewhere with spires similar to the Kremlin. There's no design name or any other clue printed on the selvage, but it definitely looks like a piece of fabric that someone hemmed to turn into a tablecloth.
I have no idea what I am going to do with this. Hide it from the world and unleash it on unsuspecting people, probably. It honestly looks like a plot token from an adventure film. My brother suggested converting it into a cape and benefiting from the talisman properties it nearly certainly possesses.


-60s/70s pillowcases, set of 4, (69p each). 
Second hand pillowcases are a very affordable way of getting interesting fabrics (every time I de-construct one, I'm amazed how much fabric is in there) . I bought a couple in a very similar print while in Wales a few years ago and used the fabric in a quilt, which is probably what I'll do with these too.


-a 12inch record of Hawaiian Songs (99p). This is the second piece of vinyl I own with sounds of Hawaii on it. I don't even have access to a record player at the moment, my parents put their's in the attic.


-This(99p):


How could I resist that face?! I need to get some of those record frames you use to display 12 inch sleeves on the wall.


I also bought my mum a tea set (£10.99), because she's having a tea party for her wedding anniversary this year, but I don't have a photo of that, it's all wrapped and I can't be bothered unwrapping and re-wrapping and bleh.

Wednesday 30 November 2011

Origami messenger bag

I finished the "super secret Christmas present" that I mentioned in my last post, and this post is about it. I decided not to give it to who I was going to, because as far as I can tell, he hates presents (and Christmas actually). We even had a family discussion about it. So this bag will be going to a mystery person on the internet as part of a Secret Santa I do every year. 


If you're part of the DIY SASS, go away! This might be your present!


I'd picked up this awesome origami Swedish animals canvas from IKEA a while back, with the intention of making my dad something out of it (he is very into origami). IKEA actually do some pretty cool fabrics at affordable prices. I think this design was £3.99 per metre, which is really good for a furnishing fabric. It's always worth checking out what they've got in.


Apologies once again for crap photos- it is so dark here!


I chose to work from this Simplicity pattern which I bought years ago:


When I was first learning to sew I made a few of those little totes (bottom right) because they were cheap and fun to decorate. They were useless though, absolutely tiny. 
This messenger bag has the exact opposite problem. It's huge!


If I carry it without anything stiff (e.g sketchbook) in it, it literally wraps around half of my body. I hope my secret Santa recipient is a big person.


The strap has a buckle on it so it's adjustable, and the entire thing is topstitched in red which would look good if I could sew in a semi straight line.


The bag is fully lined with 2 internal pockets, one a segmented pen pocket and the other a zipped one for small items (this wasn't in the instructions, I added it myself). In addition, there are 2 external pockets which fasten with Velcro.


I'm actually quite pleased with the bag, if you ignore the slightly wonky topstitching, it's actually pretty professional looking. Which makes me even more pissed off that the thing is ridiculously large. It's incredibly annoying.


Sorry gift receiver! I may make you something else to make up for this x

Tuesday 22 November 2011

Life would be easier if...

...single sized patterns came pre-cut. If there's only one size, why can't they cut it out at the factory?


Stupid pattern, taking forever to cut out *grumble mumble*.

I don't have a big table/enough desk space for pattern and fabric cutting, so I have to do it on my bedroom floor, which means kneeling on floorboards and hunching over. Sewing makes me grumpy!


I am making a special someone a Christmas present, so no telling you what it is yet! All will be revealed eventually.

Saturday 19 November 2011

Sketchbook pouch tutorial and new resolutions

Instead of having New Years resolutions, I recently made some "until New Years" resolutions. They are thus:

  1. No new clothes I don't make myself, apart from socks and maybe a pair of boots (the zip on my knee highs broke).
  2. No buying fabric or yarn. Buying notions- interfacing, thread, zips, patterns- is allowed.
The idea behind these restrictions is to save me some money, clear out some space, and get round to enjoying and actually using the fabrics and other bits and bobs (ribbon, beads, etc) that I already own instead of living in fear of "ruining them".

I also have another habit changing project on at the moment. I've been using a sketchbook diary since September 1st, in an effort to get my drawing skills up to scratch and conquer the pathetic fear of the blank page. Unfortunately, overwhelmed by drawing at uni and spending too much time away from home, I missed a lot of days in October. I realised that if I had my sketchbook diary with me, I could draw anywhere- but I didn't want it to get too bashed about in my handbag.

So I decided to make myself a sketchbook pouch (of course, I'm too tired after making this to actually fill a page today ;) ).


If you want to join in, you will need: thread, rotary cutter/scissors, marker/chalk, outer fabric, lining, batting, safety pins, pinking shears, a button/snap closure/velcro, stuff for decoration (patches or whatever).

Start by cutting out your fabric, marking how big you need it by laying out your sketchbook and adding 2.5cm all round as seam allowance as well as a flap at the top. Cut your lining as a mirror image of your fabric. Cut out your batting to fit within the rectangle body, minus the flap and seam allowances.
Note- It's a good idea to be overly generous with seam allowances. Remember, you can always cut off a little more if it's too big, but if it's too small then your sketchbook won't fit!


Place your fabric right side down, add your batting, then form a sandwich by placing the lining right side up.

Now along the top edge, including the flap, fold the edge of the fabric over (covering batting if needs be):

Then fold the lining under so the raw edge is hidden in the middle. Pin in place.

And sew:

On the right side of your fabric, mark out your quilting design and baste the 3 layers together with safety pins. I wrote "DRAW EVERY DAY" as my design.

Quilt your piece, removing the safety pins as you go along. If you want a bold design, use a contrasting thread. If you want something more subtle, use a thread that blends in with the colour of your fabric. I chose bright red thread.

Decorate the rest of your piece. I sewed on an Om patch and then quilted a circle around it, following the edge of the patch with the edge of the presser foot to keep it neat and accurate (I am notoriously rubbish at sewing circles!)


Fold your piece with right sides together and pin the bottom and side seam. Sew.

Clip your raw edges using pinking shears to stop fraying. If you don't have pinking shears, neaten up the edge with scissors and finish it off with an overlocking or zigzag stitch. Turn the pouch the right size out.
Add your closure. My machine has an automated button programme that makes sewing button holes a doddle. The button had a shank and was easy to sew in place on the opposite side.

That's it really! You should now have a pouch that's perfect for keeping a sketchbook safe from leaking pens, lost lipglosses, snacks, and other hazards lurking in your handbag.

If anyone asks them what's in your pouch, tell them it's an iPad with only a drawing app.