Monday 16 May 2011

Pocodile

This is a pocodile.


That's pocket-crocodile to not retarded people. His name is Pocky.


I made him up as I went along which I guess is why he looks a bit like a Kronosaurus. Maybe making up amigurumi as you go only works with crochet. 


Obviously something to take into account when I make his lifesize brother... (I kid, I hate seaming)

Saturday 14 May 2011

Beating the budget blues

This isn't really anything I've made. It's more something I'm forcing myself to do. When my student loan came at the start of the month (WOOO!) I knew that this time I was going to have to be better with my money. As young people go, I think I'm pretty good with my money. I don't spend it on lots of nights out, I don't buy a lot of new clothes, I cook for myself instead of eating out etc, but I need to be better with it. Why? This year I got a huge financial leg up from the Wondrous Bank of Mum and Dad. Because they'd done the same for my brother, they offered to pay my rent for the first academic year of university.


Well now it's nearly the end of that first year (EEEK) and I'm looking for somewhere else to live in the city. Got a roomate lined up, need to get a flat sorted. And then it dawned on me. I haven't been bad with my money, but I haven't been great either. I needed to make a budget.


So I drew this up:

  • £20 a week for food and drink
  • £15 a week for travel
  • £15 a week for fun
Giving myself a £50 a week budget for the last 7 weeks of term, totalling £350, leaving myself a good chunk left over from my student loan to help me afford rent while I get myself employed.

I let myself go over budget in the first week and then overspent on travel this week (I had to travel to the suburbs for a job interview) leaving me with 80p for the entire weekend. Yes, 80p.


For those of you not in the UK, here is what, approximately, 80p will buy you in London:
  • 4 copies of a rag newspaper
  • 1 button from a fabric shop
  • 2 apples (if you're lucky enough to find a shop that sells apples for 40p rather than 45)
  • a copy of Take a Break or equivalent awful magazine
  • 4 missiles in the spaceship game in the Namco Arcade
  • 8 chances on the 10p falls in the arcade of your choice
  • a small chocolate bar
  • 2 Mini Milk ice lollies
I decided to stay in today, do laundry (praying there was still money on my card) and sulk. I ended up handwashing a load of underwear because I needed to do 2 loads of laundry and only had enough on my card for one.

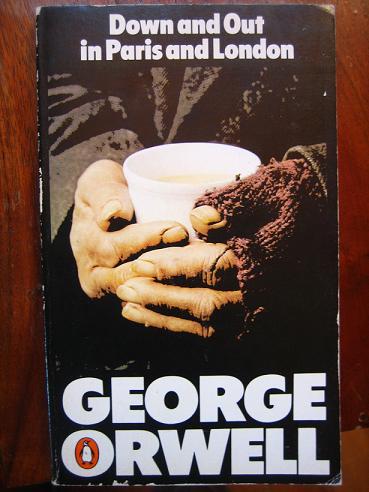
And then I started reading something that stopped me sulking.


Down and Out in Paris and London is Orwell's account of his life in the slums in the late 20s/early 30s. It didn't sound like a hoot and a half. I'm only 6 chapters in, but so far dearest George has been robbed by another lodger, pawned all of his clothes except the ones he's wearing, been living off bread/margarine/booze/tobacco for about a month, hasn't washed for 3 weeks, lost his only source of income, and had to sell his overcoat to buy food.

And even George admits that he's not the poorest around by a long shot.

I think every young person who feels perpetually broke should read this book. We may not be as well off as we'd like to be, but chances are we have a roof over our head, spare change to buy food with, and a few fancy gadgets we could sell if the situation really divebombs. I'm probably not going to be particularly rich for the majority of my life; I'm getting a degree in ceramic design FFS. But hey, if having 80p to live off for the whole weekend means that next month I have a flat sorted for next year, I think I'm willing to put up with it.

Monday 9 May 2011

Owl

I made an owl this week while watching The Ricky Gervais show on 4oD. When I make amigurumi I don't use a pattern, I just imagine the shape I want to make and then make it grow with increases and decreases. Most amigurumi animals are a variant on the same shape, you just alter the eyes, wings, ears or whatever.


I don't have a photo of it, but before I sewed the button eyes on Owl looked really quite mean.  I think amigurumi are a bit like children, you can try your hardest but they always end up with their own personality. Sometimes they turn into completely different things (I've had a cat turn into a bunny and a hermit crab start out life as a mermaid's tail).
Poor Owl looks a bit confused. Probably something to do with looking through 8 small holes in two completely different buttons I found in a baggie on a train floor.


Sorry, Owl.

Monday 2 May 2011

Yesterday I also made a pie

My mojo is definitely back.


I made pie.
I don't even like pie.


I made it just because I could.

Sunday 1 May 2011

The lazy girl's guide to making an apron.

I went through a blip in 2009 where I got a wee bit obsessed and made two aprons in a day. One was covered in American flags and frilly, and the other was made from an offcut I found at Walmart with dolphins on it (sadly, no evidence of this abomination exists).
Here is a picture of my housemate at the time regretting he'd stayed in that day:


Anyway, from what I remember, making that apron was a huge headache because I used some McCall's pattern that doesn't even exist any more which involved a bunch of ruching and turning shit inside out and *eurgh* using an iron.
Well, when I got my kit list for university, there was an apron on there that I blindly bought from the company. It was a crappy piece of white plastic that was barely waterproof and for some reason had the pocket on it sewn up. Sick of using a useless apron, I re-discovered a PVC offcut in the back of my wardrobe and set about making myself something that should last until I can afford my own studio. 


You will need:

  •  PVC. Fabric backed is best. They sell it in places like John lewis for people to use as tablecloths. My piece was about 1m by 150 which left me with a touch left over when I'd finished.
  • Woven fabric tape. You can also use ribbon but it's less durable. Roughly 2m
  • Sewing stuff- synthetic thread, pins, sharp scissors, sewing machine
  • An existing apron that fits you the way you want you new one to.
Lay your existing apron out onto your PVC. I used the lower apron here, the hideous tie-dye one because it's straight sides saved me time cutting out.

I turned it round so I got a better fit and more left over and then pinned it in place. PVC is a bitch to pin because it's not very flexible.


Cut it out and shove the other crappy apron back into the kitchen.


I had to even up the top because it ended up wonky. Okay, now take your tape, pin it in place, unwind some more of the tape and pin it where you think it should go on the other side.
Try it on. Take it on and off a few times to make sure you've made enough room for your big ol' head. When you're satisfied it's the right length, cut the tape (oh yeah, make sure you've got a good inch or so in contact with the PVC). Now take your tape ends, fold over a couple of times and zig-zag them up so they don't fray.
This is a bad shot because you can see a fraying bit, but I trimmed that. Pin your tape back in place, and with a straight stitch sew it in place. You want to make a square (or square-ish shape) with a cross in the middle. This is how bag handles are usually attached and it makes for a strong join.
Now measure out tape for your back ties. I measured mine out against a different apron I had because the ugly apron had way too long tapes.
Cut them, zig-zag them, sew them in place exactly as you did for the top loop.
There you go. One apron. I stuck a big pocket on the front but it's camouflage. To make a pocket, just cut one out of your offcut and sew in place with straight stitch. There's no need to fold any of it over because PVC doesn't fray (which was the only godsend when working with the stuff). 


And that's how you become the best dressed person in the ceramics workshop.