Wednesday 30 November 2011

Origami messenger bag

I finished the "super secret Christmas present" that I mentioned in my last post, and this post is about it. I decided not to give it to who I was going to, because as far as I can tell, he hates presents (and Christmas actually). We even had a family discussion about it. So this bag will be going to a mystery person on the internet as part of a Secret Santa I do every year. 


If you're part of the DIY SASS, go away! This might be your present!


I'd picked up this awesome origami Swedish animals canvas from IKEA a while back, with the intention of making my dad something out of it (he is very into origami). IKEA actually do some pretty cool fabrics at affordable prices. I think this design was £3.99 per metre, which is really good for a furnishing fabric. It's always worth checking out what they've got in.


Apologies once again for crap photos- it is so dark here!


I chose to work from this Simplicity pattern which I bought years ago:


When I was first learning to sew I made a few of those little totes (bottom right) because they were cheap and fun to decorate. They were useless though, absolutely tiny. 
This messenger bag has the exact opposite problem. It's huge!


If I carry it without anything stiff (e.g sketchbook) in it, it literally wraps around half of my body. I hope my secret Santa recipient is a big person.


The strap has a buckle on it so it's adjustable, and the entire thing is topstitched in red which would look good if I could sew in a semi straight line.


The bag is fully lined with 2 internal pockets, one a segmented pen pocket and the other a zipped one for small items (this wasn't in the instructions, I added it myself). In addition, there are 2 external pockets which fasten with Velcro.


I'm actually quite pleased with the bag, if you ignore the slightly wonky topstitching, it's actually pretty professional looking. Which makes me even more pissed off that the thing is ridiculously large. It's incredibly annoying.


Sorry gift receiver! I may make you something else to make up for this x

Tuesday 22 November 2011

Life would be easier if...

...single sized patterns came pre-cut. If there's only one size, why can't they cut it out at the factory?


Stupid pattern, taking forever to cut out *grumble mumble*.

I don't have a big table/enough desk space for pattern and fabric cutting, so I have to do it on my bedroom floor, which means kneeling on floorboards and hunching over. Sewing makes me grumpy!


I am making a special someone a Christmas present, so no telling you what it is yet! All will be revealed eventually.

Saturday 19 November 2011

Sketchbook pouch tutorial and new resolutions

Instead of having New Years resolutions, I recently made some "until New Years" resolutions. They are thus:

  1. No new clothes I don't make myself, apart from socks and maybe a pair of boots (the zip on my knee highs broke).
  2. No buying fabric or yarn. Buying notions- interfacing, thread, zips, patterns- is allowed.
The idea behind these restrictions is to save me some money, clear out some space, and get round to enjoying and actually using the fabrics and other bits and bobs (ribbon, beads, etc) that I already own instead of living in fear of "ruining them".

I also have another habit changing project on at the moment. I've been using a sketchbook diary since September 1st, in an effort to get my drawing skills up to scratch and conquer the pathetic fear of the blank page. Unfortunately, overwhelmed by drawing at uni and spending too much time away from home, I missed a lot of days in October. I realised that if I had my sketchbook diary with me, I could draw anywhere- but I didn't want it to get too bashed about in my handbag.

So I decided to make myself a sketchbook pouch (of course, I'm too tired after making this to actually fill a page today ;) ).


If you want to join in, you will need: thread, rotary cutter/scissors, marker/chalk, outer fabric, lining, batting, safety pins, pinking shears, a button/snap closure/velcro, stuff for decoration (patches or whatever).

Start by cutting out your fabric, marking how big you need it by laying out your sketchbook and adding 2.5cm all round as seam allowance as well as a flap at the top. Cut your lining as a mirror image of your fabric. Cut out your batting to fit within the rectangle body, minus the flap and seam allowances.
Note- It's a good idea to be overly generous with seam allowances. Remember, you can always cut off a little more if it's too big, but if it's too small then your sketchbook won't fit!


Place your fabric right side down, add your batting, then form a sandwich by placing the lining right side up.

Now along the top edge, including the flap, fold the edge of the fabric over (covering batting if needs be):

Then fold the lining under so the raw edge is hidden in the middle. Pin in place.

And sew:

On the right side of your fabric, mark out your quilting design and baste the 3 layers together with safety pins. I wrote "DRAW EVERY DAY" as my design.

Quilt your piece, removing the safety pins as you go along. If you want a bold design, use a contrasting thread. If you want something more subtle, use a thread that blends in with the colour of your fabric. I chose bright red thread.

Decorate the rest of your piece. I sewed on an Om patch and then quilted a circle around it, following the edge of the patch with the edge of the presser foot to keep it neat and accurate (I am notoriously rubbish at sewing circles!)


Fold your piece with right sides together and pin the bottom and side seam. Sew.

Clip your raw edges using pinking shears to stop fraying. If you don't have pinking shears, neaten up the edge with scissors and finish it off with an overlocking or zigzag stitch. Turn the pouch the right size out.
Add your closure. My machine has an automated button programme that makes sewing button holes a doddle. The button had a shank and was easy to sew in place on the opposite side.

That's it really! You should now have a pouch that's perfect for keeping a sketchbook safe from leaking pens, lost lipglosses, snacks, and other hazards lurking in your handbag.

If anyone asks them what's in your pouch, tell them it's an iPad with only a drawing app.

Sunday 13 November 2011

Ooh la la- 4 fruit marmalade

Occasionally, I get wild, untamed urges to make things. A lot of the time, I just have to ignore them, especially when they are the urge to make the following things: babies, killdozers, tree-houses, anything with rhinestones on. But sometimes I just give in, and get sticky. That's what happened this weekend.


I can't give you the recipe because it's from an old Good Housekeeping book, but I can give you the general gist of how to make marmalade. There are various recipes online, so pick one, follow it and go for it!


In terms of equipment you will need: a large saucepan, wooden spoon, chopping board, sharp knife, cloth for pith bag, wide metal funnel, jars with lids, saucers/side plates.


Here are my ingredients:


Organic limes, organic lemons, sweet oranges, one red grapefruit and one white grapefruit, 5kg bag of British sugar-beet sugar. I didn't know which kind of grapefruit to get.


The oranges, limes and lemons get juiced and the juice gets put in the pan. Any pips need to go in your pith bag (a square of muslin for pith and pips. I used a square of net curtain). You can chop up the peel in a food processor, or slice it finely by hand which it what I chose to do because I hate wrestling with kitchen tech.


As for the grapefruits...


I had no idea they have so much pith! To be honest, I have very little experience of grapefruit. E.g no experience. Anyway, peel the grapefruit and put it to one side, then try and slice as much pith off the peel. Pith goes in the pith bag!


Then claw as much pith as you can off the fruit, along with any stringy bits or pips. Fingernails help. Roughly chop up the flesh. Red grapefruit looks disturbingly like sashimi when it's been butchered.


Chuck everything in the pan and tie up the pith bag (I used a clean rubber band).


And then add how ever much water your recipe calls for.


And simmer away for 1.5 to 2 hours, until the liquid has reduced by half. It smells amazing. Time to weigh out the sugar, I used my mum's old school scales because the digital ones aren't great with large weights.


It was enough sugar to fill our largest pyrex bowl. Put the sugar with the jars and lids to warm in the oven, at about 110°c, about half an hour before your mix is ready. Put a stack of side plates or saucers in the fridge.


Remove your pith bag and give it a really good squeeze over the pan to get as much pectin as you can out and discard it (if you used a natural cloth and string, it can go straight to compost). Okay, now you add the sugar and stir really well to make sure it's all dissolved. Bring to the boil and leave simmering for 20 minutes. 


Now we do our sampling. Take a cold saucer out from the fridge, spoon a little mix onto it and put it back in the fridge for a couple of minutes. Take it out, and drag your finger across it. If it wrinkles nicely, then it's ready to go. If it pools instead of wrinkling, then it's not ready. Here's mine ready to go:


Take the pan off the heat and leave it to sit for 15 minutes. Then take your jars and lids out of the oven and put them somewhere stable. Using your funnel, fill your jars as full as you can and put on the lids. It's hot. It splashes. Take your time and ignore the awful sensation of scalding marmalade leaving its mark on your forehead.


Naturally, the peel didn't behave and chose to float to the top instead. So there you go, semi-organic, British, artisan 4 (technically 5) fruit marmalade.


Ooh la la indeed.

Saturday 5 November 2011

Getting on with my uni projects

This week I have worked some long, killer hours in the studio, which is horrible because we have no natural light in there and a lot of exposed pipework and plywood. Those conditions, and the fact that most of the class wear identical jumpsuits, have led to several comparisons to a prison workshop. On Thursday I left the house at 8am and didn't get back until 22:15. Today I meant to go in again, but instead I dossed about all morning, then went to Ikea with my mum in the afternoon and bought a foam mattress topper (I am sleeping on the same bed I've had since we moved into this house in 1997). It's currently unwrapped and smells extremely chemical, which is probably why I'm writing a blog post at 1am instead of going to bed so I can go into the workshop on Saturday.


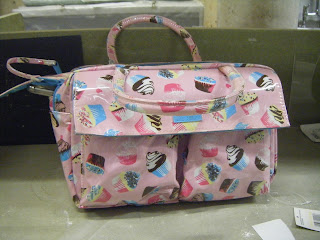
I thought I'd show you some of my work, but I didn't actually get as far as I wanted to, so for starters, here's a pic of my toolbox:


For my first term, I had this horrible black plastic toolbox that was too large to fit in my locker unless placed on its end, and had no compartments, which turned digging through it into a game of "find the sharp thing with you fingertips". When I got my phone, O2 gave me a £50 Debenhams voucher, and I found this washbag on sale (for ~£12 marked down from ~£30) and snapped it up. It's wipe-clean, and I can store smaller tools in the two front pockets, plus it fits in my locker great and can be carried hands-free as the handles loop over my wrist instead. Very wise purchase!


This term I am attempting to make tea-cups from scratch- making a model in plaster using a technique called "sledging", then making a mould of the model, carving out a handle and making a mould of that, then slip-casting everything, glazing it clear or white (undecided), making lithographs and transferring them on, and then, finally, gilding the edges if I have the cash for gilt. It's a long and horrible process, one which doesn't begin to hint at the saucer.


You know that huge process list I just laid out? It doesn't even cover the beginning, when I have to cut out sledging profiles from zinc using a fret saw, and then refine them down with files and sandpaper. The whole thing has already been a pain in the ass. The above pic shows my zinc edge profile standing next to my perspex base profile, which has been glued onto a wooden board. To make the model, you run the zinc profile over plaster which is piled onto the perspex base. Eventually the zinc profile follows the shape of the base profile.


Still with me?


Here's what I was making, and was told to abandon in lieu of making the tea-cups instead:


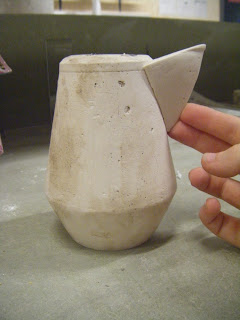
I carved this jug's body from plaster using chisels as it spun on the lathe. The process took me about 4 hours because I'm not very confident on the lathe (it was only my second time ever using one). As you can see, there were bubbles in the plaster. I tried to fill them in, but it didn't work so well.


The snip (that's the bit you pour from, like a spout) is made separately and hand carved, although it locates on the body with a natch (a natch is like a notch. No, I don't know why we say natch instead). It's not quite symmetrical, but I still really like the form. A couple of friends told me it looks like a bird, so if I get time I would like to finish this off, produce a mould from it and make some great brightly coloured bird of paradise jugs.


I really hope I get time to finish this little beauty, and get those blasted tea-cups finished, but I won't if I don't get some sleep on my fabulous new squishy chemical mattress topper, so goodnight to all of you. x

Tuesday 1 November 2011

Handmade, home-made Halloween!

I unashamedly will admit right here, right now, that Halloween is probably my favourite annual celebration. As a young, adolescent gothlet, I used to throw the lamest Halloween parties, in which myself and a handful of friends would "dress up" (I use this term loosely), play around with a ouija board, drink too much diet coke and then get bored. They were awful parties. One year we watched Sister Act. Another year we played Soul Calibur 3, but we only had one PS2 controller.


And still, I love Halloween.


This year, I decided to be a pilot for the Sunday night party I got invited to. I was actually planning to be a male pilot with my hair tucked under a trapper hat (and wearing cargo trousers instead of a mini skirt, obviously!), but I couldn't find the right kind of fake moustache anywhere.


Not pictured- my £9 goggles from Ebay. They were pretty cool, but if I put them up on my head they squished my victory roll hairstyle. I did take them to the party though, unlike my silk scarf, which I forgot.


Complete costume run down, from top to bottom:

  • Hair- victory rolls. They're created with just a brush, bobby pins and a lot of hairspray. I followed the tutorial up on Diary of a Vintage Girl. The back was a bun created with a sock ring. It was my first time doing either style!
    Cost- about £1.50 for the hairspray and bobby pins. I got them cheap from Wilkinsons.
  • Lucky clover necklace. Can't go up with a bit of luck! This was a present from a boyfriend a couple of years ago.
  • White shirt. I glued on a couple of authentic air support/command patches, and pinned on a vaguely air-forcish brooch. The shirt was an old work shirt that I don't like. It wrinkles really badly and is very unflattering.
  • Jacket. This is my regular, everyday fake black leather jacket. It was £3 in 2003 from a clearance rack and has done me proud ever since. I made the collar and cuffs from half a metre of cream fake fur I got from John Lewis. They were hemmed by hand and sewed into the lining.
    Cost- £2.25 for the fake fur.
  • Bag- authentic medic bag from an army surplus store in Southwark. Bought it last year to be my uni bag, but it's really difficult to access in a hurry. I think it was about £12 or £15.
  • Skirt- a regular part of my wardrobe. From Uni-Qlo, I think.
  • Boots- my regular winter calf highs.
Total cost to me, excluding things I didn't purpose buy for this costume: £13.75

My mum made a crumble, so I posed with that too. Because my mum makes good crumble.


So that was my costume.

You can't have Halloween without Jack O Lanterns. If you don't have some kind of carved vegetable by outside your door, your house will become infested with evil spirits. FACT.


This year I made two, because I couldn't resist carving up a tiny green pumpkin that had been knocking round our fridge for a while. I like to collect the seeds and the flesh for eating.
This is my method for carving a bigger pumpkin:
  1. Lay out your tools and materials. You will need a big knife, bowls for the pumpkin innards, and an ice cream scoop.
  2. Cut the lid in a zig-zag shape, to create a lid that can only fit in a specific way.
  3. Pull the lid off, scrape the pulp off into one bowl, and cut the pumpkin flesh from the lid into another bowl. Drag as much of the pulp and seeds as you can out into a bowl.
  4. Score the inside of the pumpkin with your knife then reach in with your ice cream scoop and scrape out as much flesh as you can.
  5. Put the lid back on, score your design on the outside of the pumpkin, then get to work carving out your spoooooooooky faaaaaaaaace.

The tiny one was actually really easy to do, it was so small that I scooped out all the insides in one twist of the ice cream scoop.

Monster cat didn't seem that scared though.